STANTON SCS.3D


for VirtualDJ 8.0
Last Update : July 2016
 

SETUP


Step 1. Connections & Hardware Setup


No drivers is necessary to install in both Windows and Mac. Simply connect the SCS.3d to your computer using the provided USB cable (connection at the bottom of the unit).or to the USB Hub of the SCS.3m (if the SCS.3.system is available)

Step 2. VirtualDJ Setup


Download and Install VirtualDJ 8 from http://www.virtualdj.com/download/index.html (in case you have not done already)

Start VirtualDJ and login with your Account credentials. A Pro Infinity, Pro Subscription or Plus Controller License is required.


Detection Window
A detection window will be offered the first time the Stanton SCS.3d is connected with VirtualDJ, verifying proper connection.

Click to OK
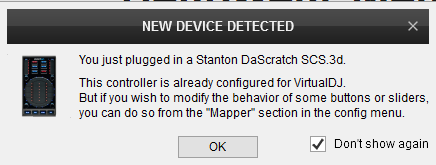

Unit is now ready to operate.
 

CONTROLS
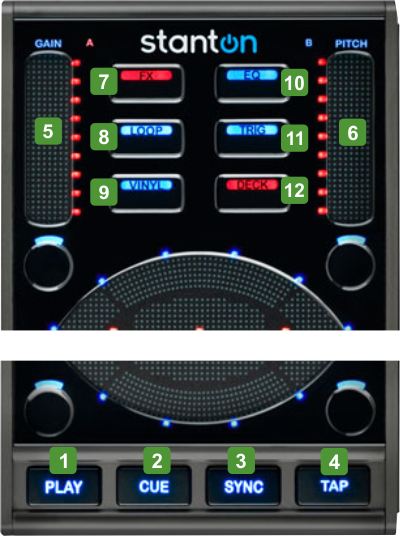


KEY

ACTION

1 PLAY
Play/pause track
2 CUE
Cue/Stop. Stops track at Cue point if playing. Sets a Temporary Cue if paused. Previews track while pressed
3 SYNC
Matches Tempo and Beatgrid phase with the opposite deck (or Master Deck if 4 decks are used)
4 TAP
Manually tap tempo
5 SL1
Seek/Navigate through track
6 SL2
Adjust Track's tempo
7 FX
Selects FX mode
8 LOOP
Selects Loop mode
9 VINYL
Selects Vinyl mode
10 EQ
Selects EQ mode
11 TRIG
Selects Hotcue mode
12 DECK
Assigns unit to a deck (left/right if 2 units are available - cycle through all decks if 1 unit is available)


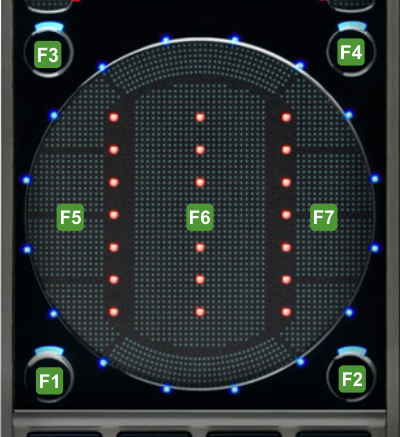
FX MODE


KEY

ACTION

F1 BUT1
Select Previous Effect
F2 BUT2
Select Next Effect
F3 BUT3
Enable Beat grid Effect
F4 BUT4
Enable Flanger Effect
F5 SL-LEFT
Adjust Effect Parameter 1
F6 SL-MID
Enable Selected Effect
F7 SL-RIGHT
Adjust Effect Parameter 2


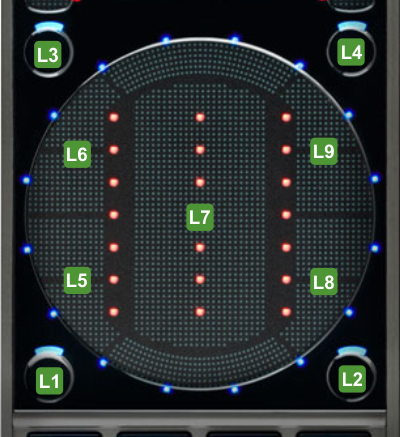
LOOP MODE


KEY

ACTION

L1 BUT1
Set Loop In point
L2 BUT2
Set Loop Out point
L3 BUT3
Enables the last triggered loop (reloop)
L4 BUT4
Toggles between Short and Long Loop Banks
L5 SL-1
Short Loop Bank : 1/2 beat Auto-loop
Long Loop Bank : 16 beats Auto-loops
L6 SL-2
Short Loop Bank : 1/4 beat Auto-loop
Long Loop Bank : 8 beats Auto-loops
L7 SL-3
4 beats Auto-loops
L8 SL-4
Short Loop Bank : 2 beat Auto-loop
Long Loop Bank : 64 beats Auto-loops
L9 SL-5
Short Loop Bank : 1 beat Auto-loop
Long Loop Bank : 32 beats Auto-loops


VINYL MODE
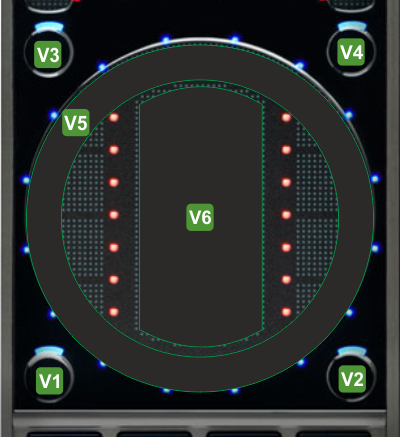


KEY

ACTION

V1 BUT1
Temporary slow-down track (Pitch Bend)
V2 BUT2
Temporary speedup track (Pitch Bend)
V3 BUT3
Toggles between Scratch (Vinyl) and Bend (CD) mode for the Jogwheel
V4 BUT4
Master Tempo (Key-Lock)
V5 JOG
Touch-sensitive Jogwheel strip. Scratch or Bend depending on the Jogwheel mode
V6 SCRATCH
Vertical Touch-sensitive Jogwheel strip. Scratch or Bend depending on the Jogwheel mode


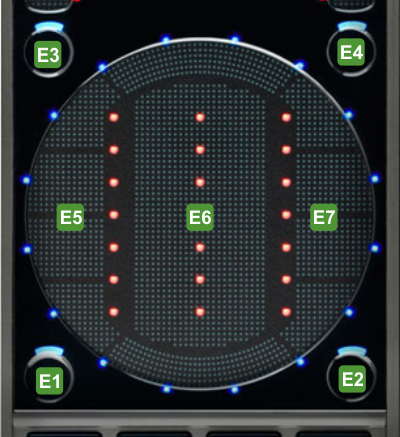
EQ MODE


KEY

ACTION

E1 BUT1
Kill Equalizer Low
E2 BUT2
Reset Equalizer
E3 BUT3
Kill Equalizer Mid
E4 BUT4
Kill Equalizer High
E5 SL-LEFT
Adjust Equalizer Low
E6 SL-MID
Adjust Equalizer Mid
E7 SL-RIGHT
Adjust Equalizer High


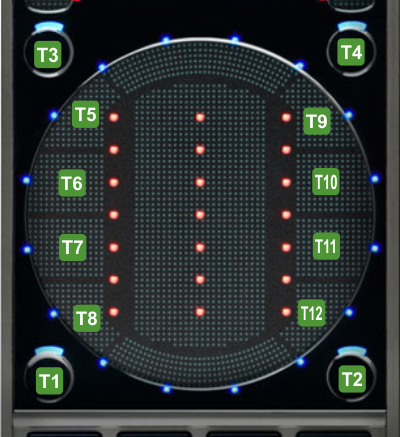
HOTCUE (TRIG) MODE


KEY

ACTION

T1 BUT1
Smart Cue (Hotcues will be triggered quantized
T2 BUT2
Quantize SetCue. Hotcues will be set quantized
T3 BUT3
Enable Set mode.
T4 BUT4
Enable Delete mode
T5 HC1
Trigger Hotcue 1
Set mode. Set Hotcue 1 at current position
Delete mode : Delete Hotcue 1
T6 HC2
Trigger Hotcue 2
Set mode. Set Hotcue 2 at current position
Delete mode : Delete Hotcue 2
T7 HC3
Trigger Hotcue 3
Set mode. Set Hotcue 3 at current position
Delete mode : Delete Hotcue 3
T8 HC4
Trigger Hotcue 4
Set mode. Set Hotcue 4 at current position
Delete mode : Delete Hotcue 4
T9 HC5
Trigger Hotcue 5
Set mode. Set Hotcue 5 at current position
Delete mode : Delete Hotcue 5
T10 HC6
Trigger Hotcue 6
Set mode. Set Hotcue 6 at current position
Delete mode : Delete Hotcue 6
T11 HC7
Trigger Hotcue 7
Set mode. Set Hotcue 7 at current position
Delete mode : Delete Hotcue 7
T12 HC8
Trigger Hotcue 8
Set mode. Set Hotcue 8 at current position
Delete mode : Delete Hotcue 8


Hardware Integration Department
2016 - ATOMIX PRODUCTIONS


Reproduction of this manual in full or in part without written permission from Atomix Productions is prohibited.